Increasing the Life of Your Air Conditioner: How to Install a 'Hard Start' Kit

A/C Compressor is Mechanical
An air conditioning unit's compressor, like anything mechanical, has a limited lifespan. After a given amount of use, the mechanical parts will wear out and subsequently need to be replaced. An air conditioner's compressor is highly mechanical and it is expensive to replace.
Why Install A Hard Start Kit?
A "Hard Start" kit can be used to (supposedly) increase the life span of an air conditioner's compressor. The "Hard Start" kit is comprised of a large capacitor and a special relay.
The operation of the Hard Start kit is fairly simple. The relay adds the capacitor's capacitance to the circuit when the compressor is first turned on. After the compressor starts running, the relay opens up and therefore drops the extra capacitance out of the system.
The extra capacitance (unlike what a technician may tell you) doesn't give the compressor any extra voltage, current or power at start-up. What it does do (which any electrical engineer can confirm) is it changes the phase of the voltage versus the current and this leads to extra start-up torque, which reduces the wear and tear on the compressor. The "Hard Start" kit therefore makes the start-up phase of the compressor operation more efficient.
Previous Article
I previously wrote a blog post about how I learned about a Hard Start Kit and how A/C companies overcharge for the installation of a Hard Start Kit.
Not being able to be ripped off by such a large degree ($410 for 15 minutes of labor), I decided to install one myself.
My Background
My background: I am not trained in HVAC. I'm a technical guy and every once in a while, I like to use that Electrical Engineering college degree I paid so much to earn back in the early 2000's (I need to write an article about how I got fired before showing up to the first day of work back in the dot-com crash).
In this article, I will explain everything I learned and how I installed a Hard Start Kit on my own air conditioning unit.
** Warning **
NOTE: YOU SHOULD NOT ATTEMPT TO INSTALL A HARD START KIT ON YOUR OWN. HIRE A PROFESSIONAL TO DO IT FOR YOU. WHAT FOLLOWS IS STRICKLY FOR EDUCATIONAL PURPOSES. THE INSTRUCTIONS MAY NOT BE COMPREHENSIVE AND THEY MAY HAVE ERRORS THAT COULD GET YOU SERIOUSLY INJURED AND/OR CAUSE YOU TO DO EXTENSIVE AND EXPENSIVE DAMAGE TO YOUR A/C UNIT. THIS DOCUMENTATION IS NOT MEANT TO BE USED BY ANYONE, ESPECIALLY SOMEONE WITHOUT FORMAL TRAINING IN HEATING/COOLING SYSTEMS.
With that liability clause out of the way, here is my documentation:
Ordering a Hard Start Kit
Interestingly I had to learn about getting this first step right from a technician I met, I didn't see or read any discussion about it when doing my own research.
I didn't realize there are different size Hard Start Kits and you need to purchase a kit that matches the tonnage of your a/c unit. Again, installing a Hard Start Kit is about creating the correct conditions to maximize start-up efficiency for your air conditioning unit compressor. Using the wrong sized kit likely wouldn't help increase the life of my unit, and would more likely actually shorten its life by reducing efficiency.
Determine A/C Unit Tonnage
It took just a quick Google search for "how to find the tonnage of an ac unit" and I found a "ton" (pun intended) of articles on how to determine the tonnage of my unit.
Purchase Correct Size Hard Start Kit
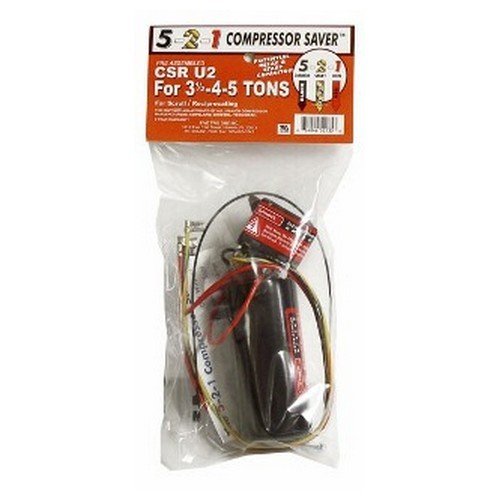
My compressor is a 3.5 ton unit. So I purchased the 5-2-1 Compressor Saver Hard Start Capacitor Model CSR U2 which corresponds to my air conditioner's tonnage. In the picture, it shows its for 3.5 -4-5 Ton Units.
Links to Hard Start Kits
- Hard Start Kit for 1 to 3 Ton Units
- Hard Start Kit for 3.5 to 5 Ton Units
- Hard Start Kit for 4 to 5 Ton Units
Install the Hard Start Kit
After I received my Hard Start Kit, it was time to begin the installation.
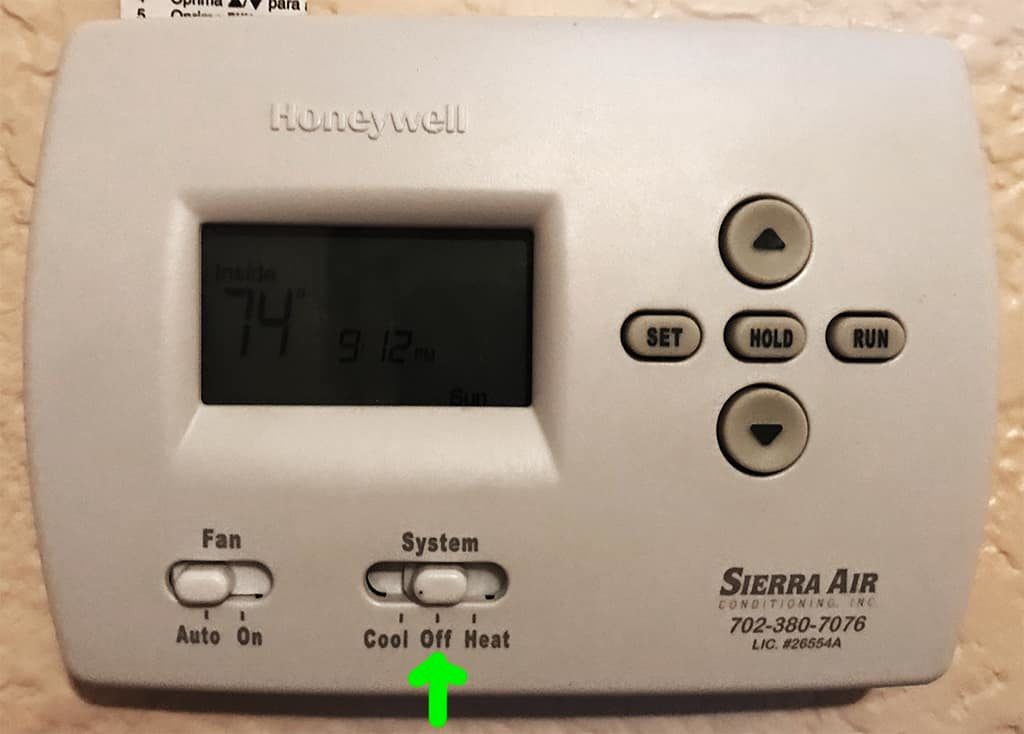
Turn the Control Panels to Off
First thing I did was turn the control panels to the "off" position so that the air conditioning unit wouldn't be running when I disconnected the power in the next step. Our house not only has two air conditioning units, but one unit feeds two independent "zones". Thus I had to make sure both control panels were set to the "off" position.
Disconnect the Power
Before opening up my a/c unit's power box I made sure to disconnect the power to the unit. There's 240 volts going to this thing and I didn't want to get bit by it.
I've taken 120V a few times when I was too lazy to cut the breaker when working on an outlet or light socket in my home. 120V isn't actually too bad of a bite, but I'd be very afraid to take double that. Plus, these things are so expensive I definitely wouldn't want to accidentally cross the streams and blow an expensive part of the unit out. So this is a job where I don't dare be lazy in any aspect. I made sure to cut the power, and even go so far as checking the unit with a voltmeter to verify the power was cut.
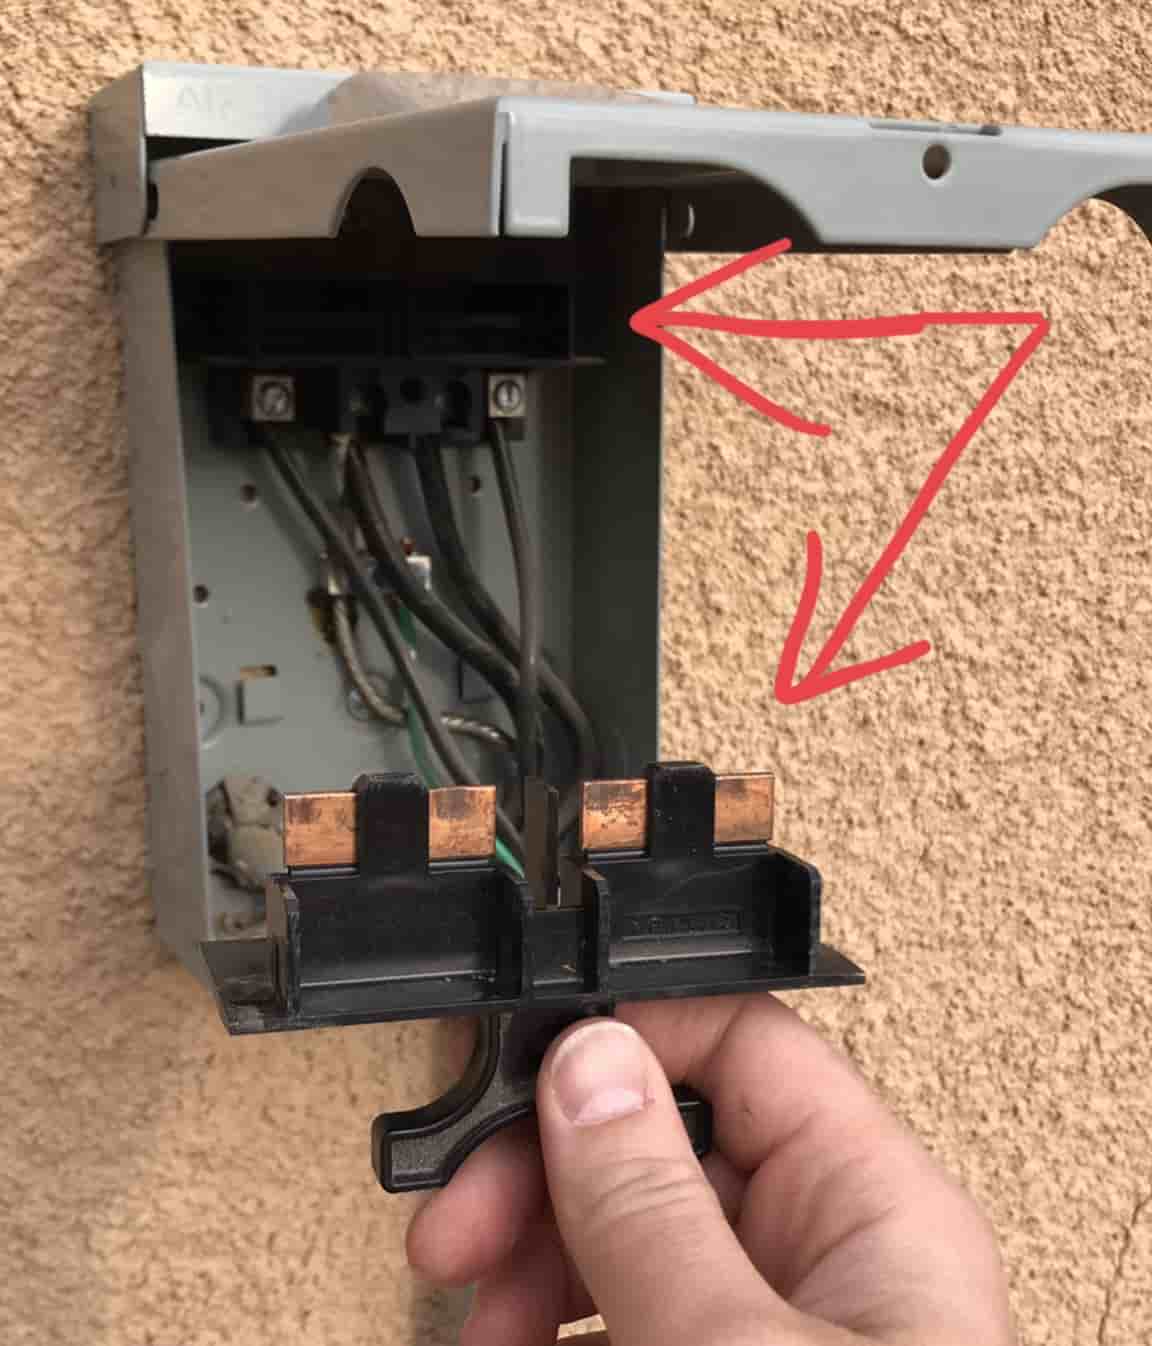
On my system there is a breaker on the wall right next to the unit.
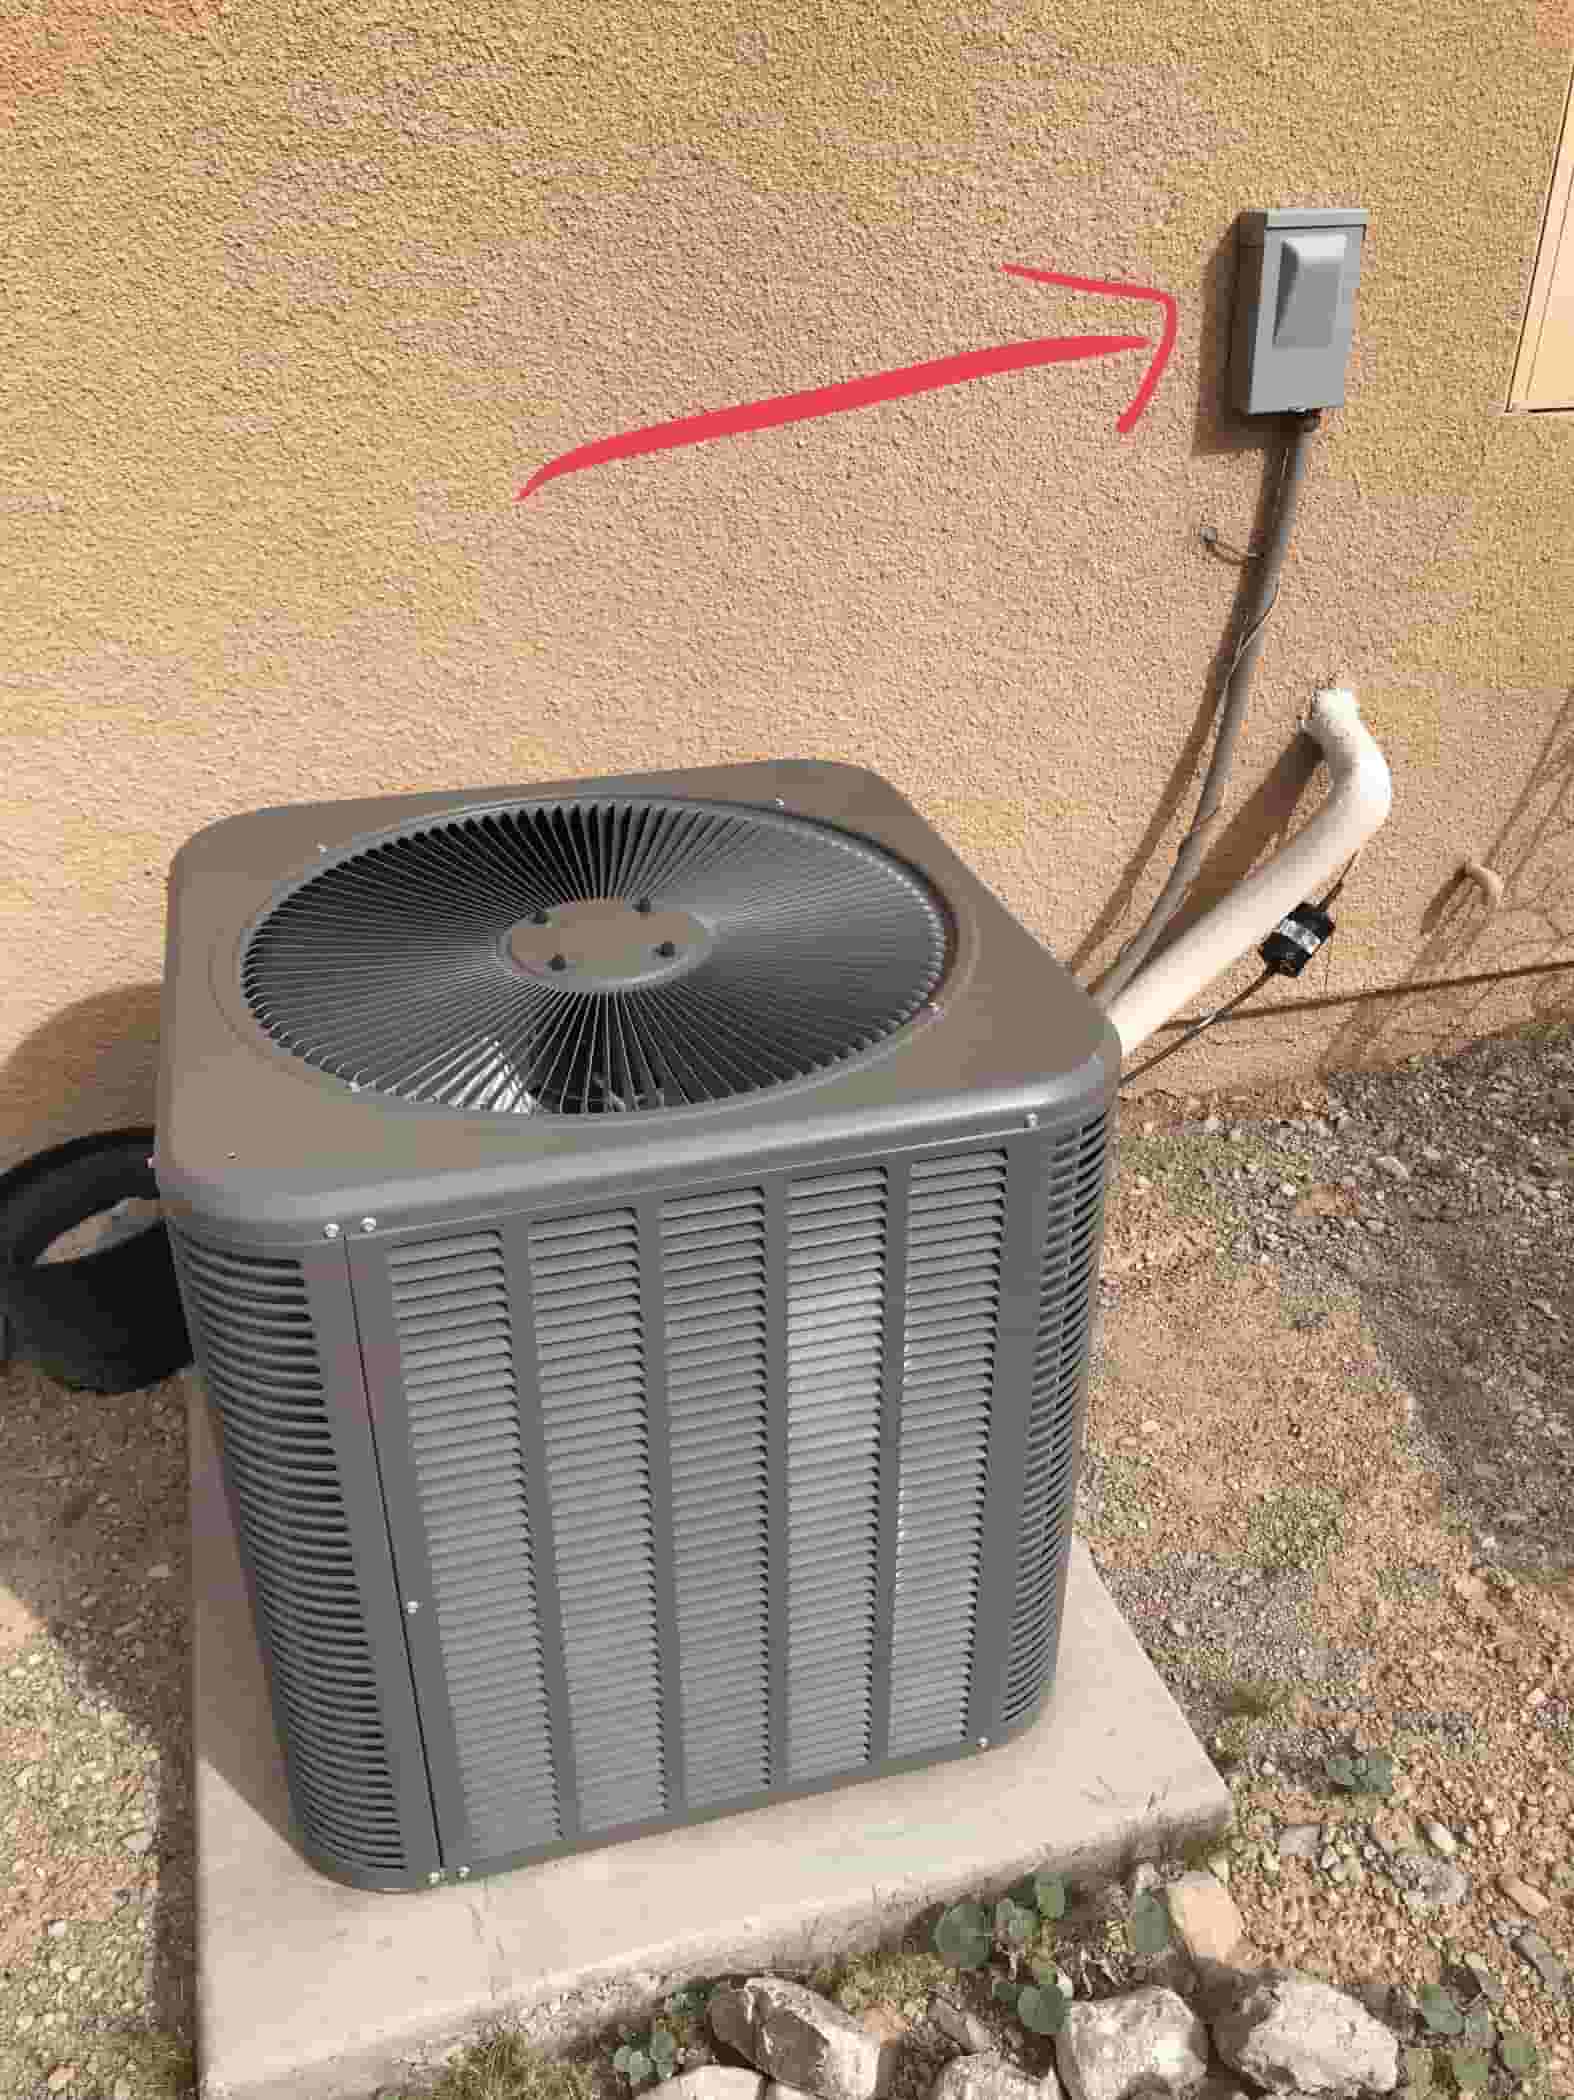
All I had to do was open the breaker box and pull the breaker vial its handle straight out.
Open Up the Power Panel
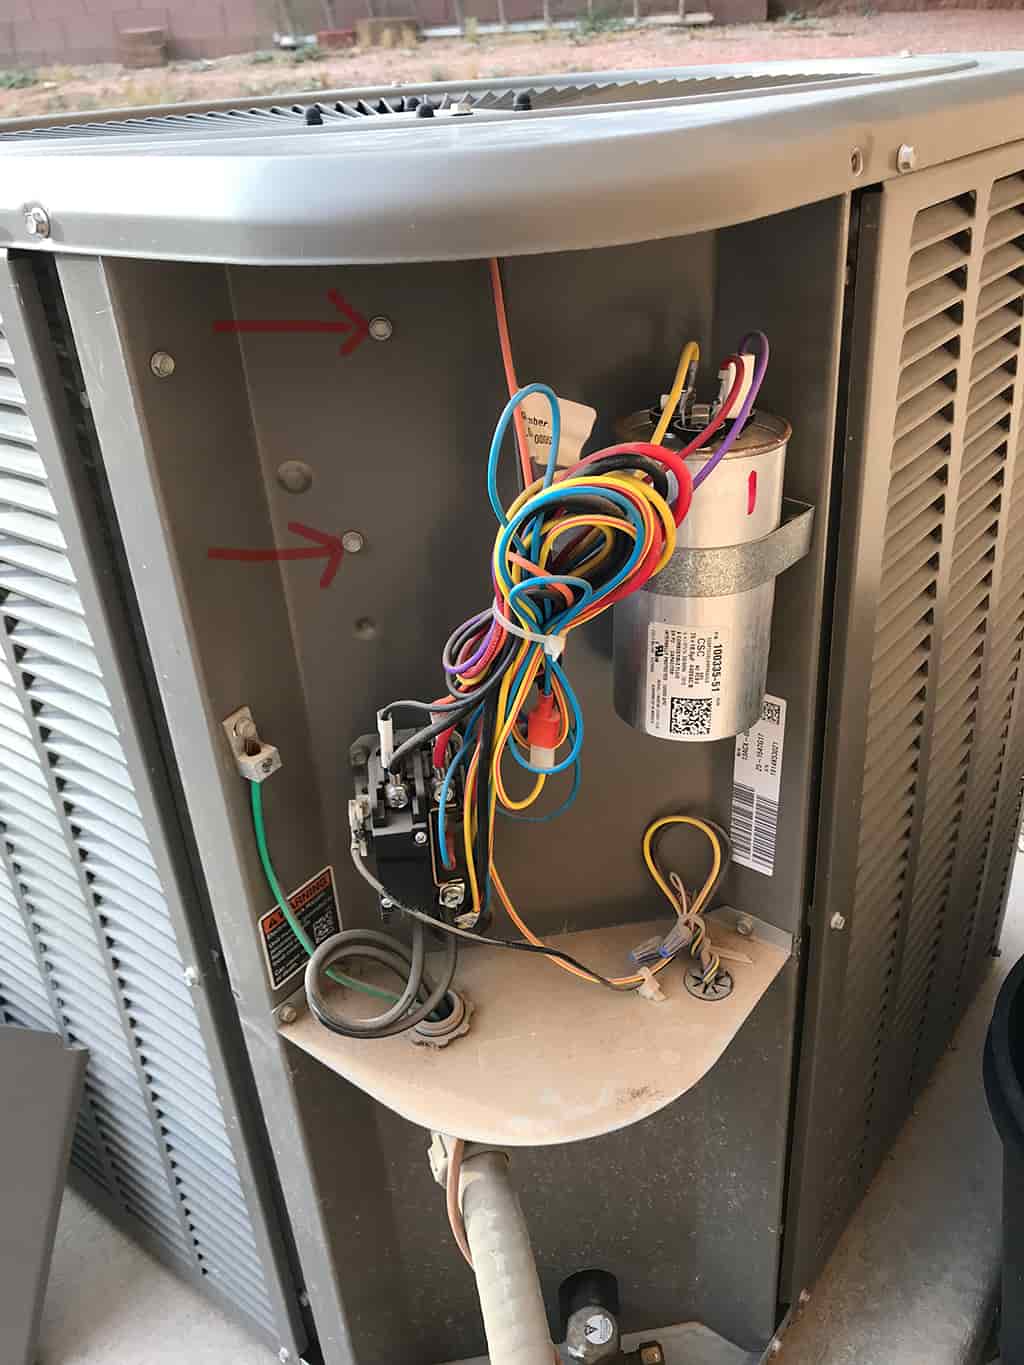
Next, I needed to remove the panel door on the ac condenser unit's power box. The panel door of my unit came off by removing two screws.
And LOW AND BEHOLD there's already two mounting screws just waiting to be used for an upgrade such as adding a Hard Start Kit.
Mount the Hard Start Kit Components
Next, I mounted the capacitor and relay that make up the "Hard Start Kit" inside the a/c condenser unit's power panel box.
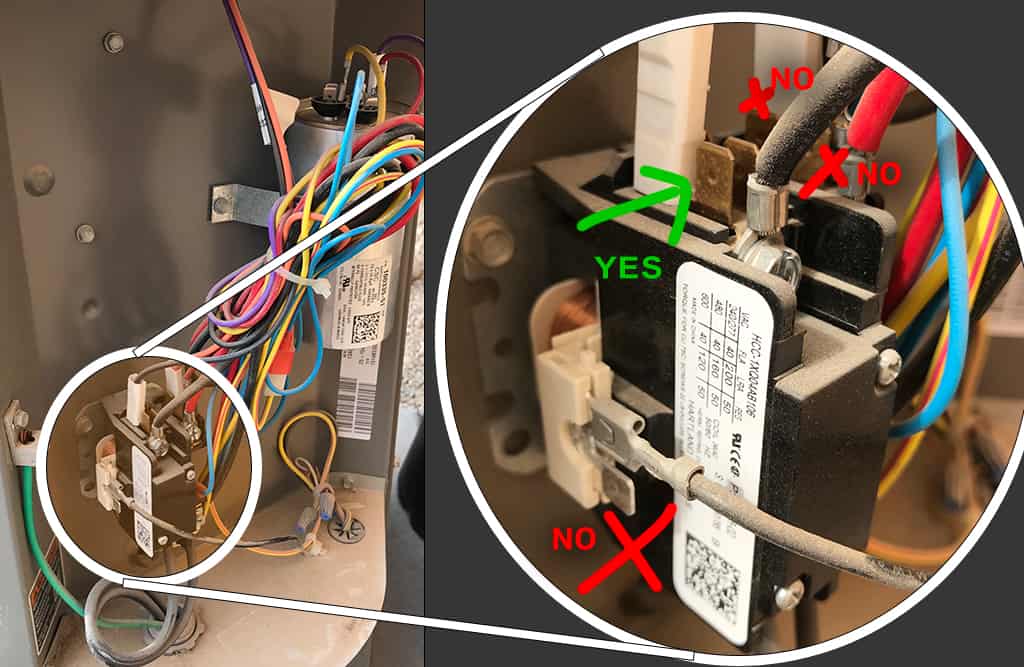
Correctly Mount the Gravity Relay
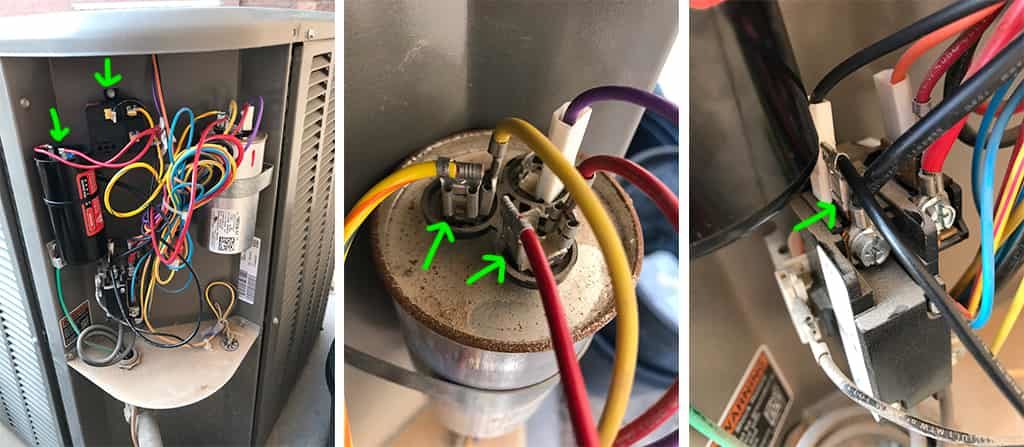
Installing the gravity sensor takes another tidbit of knowledge. The relay is a special kind of relay that uses gravity as part of its operation. So I had to be sure to mount the gravity in the correct orientation. For my Hard Start Kit, per the instructions that came with it, the proper orientation was for the screw mount hole to be on the top.
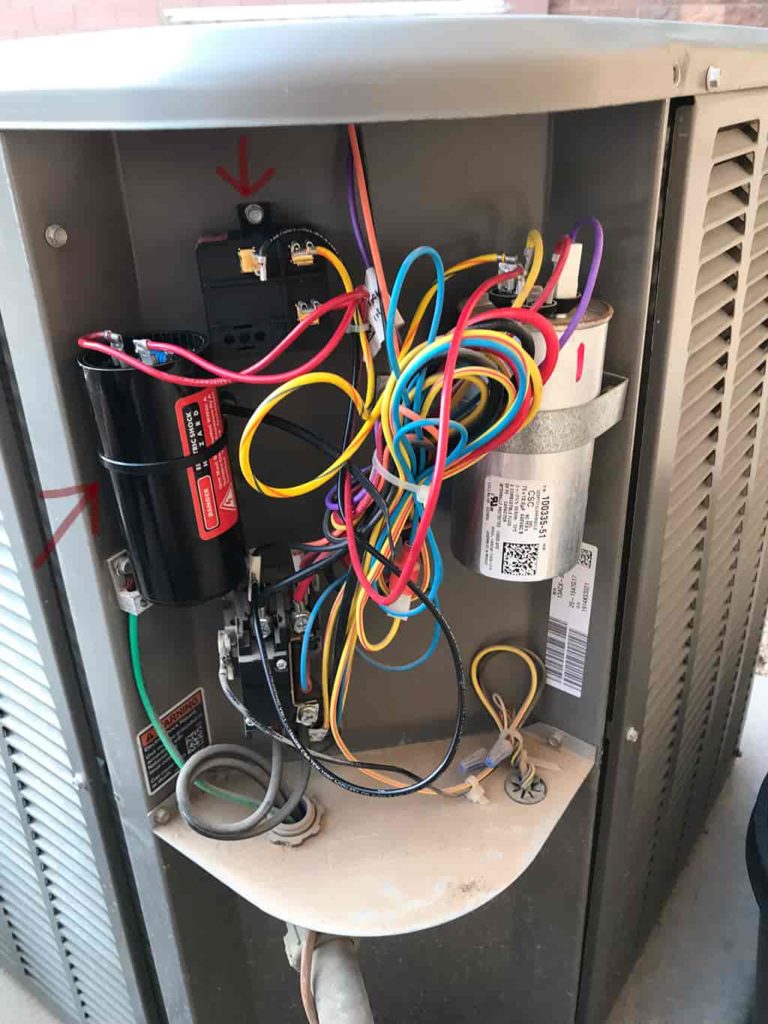
An arrow in the picture below points to the mounting screw holding the gravity relay in its correct orientation.
Correctly Mount the Hard Start Kit Capacitor
The Hard Start Kit came with a mounting zip tie that I used to mount the capacitor to the second available upgrade screw in the box. The mounting zip tie is just like a regular zip tie but with an extra screw hole at the end.
The capacitor should be mounted vertically with its top leads at least an inch from any other conductive system elements.
You can see the zip tie pointed to with an arrow in the picture above.
Verify Run Capacitor Is Discharged
I'm not sure if the run capacitor (the silver verticle tube on the right side of the above picture) has a bleed resistor in its circuit or not, but I made sure the capacitor was discharged. Remember, the A/C power to the unit has been removed at this point. If there were a charge somehow stored on the capacitor it would be a DC type voltage, so I simply set my voltmeter to measure DC and put one lead on the common terminal and then probed each of the 3 the run capacitor's top poles with the other lead. I did not find a voltage, but if there had a residual voltage left on the capacitor, I would have figure out how to properly discharge it. Likely just having the meter on the capacitor for a while would discharge it, as a Voltmeter actually uses a very high resistance in parallel with the circuit to read the voltage.
<I didn't take a picture of this. I hope to add it soon.>
Connect the Hard Start Kit Wires
Next I needed to connect up the wires of the Hard Start Kit to the air conditioners parts. I did this following the diagram that comes with the Hard Start Kit.
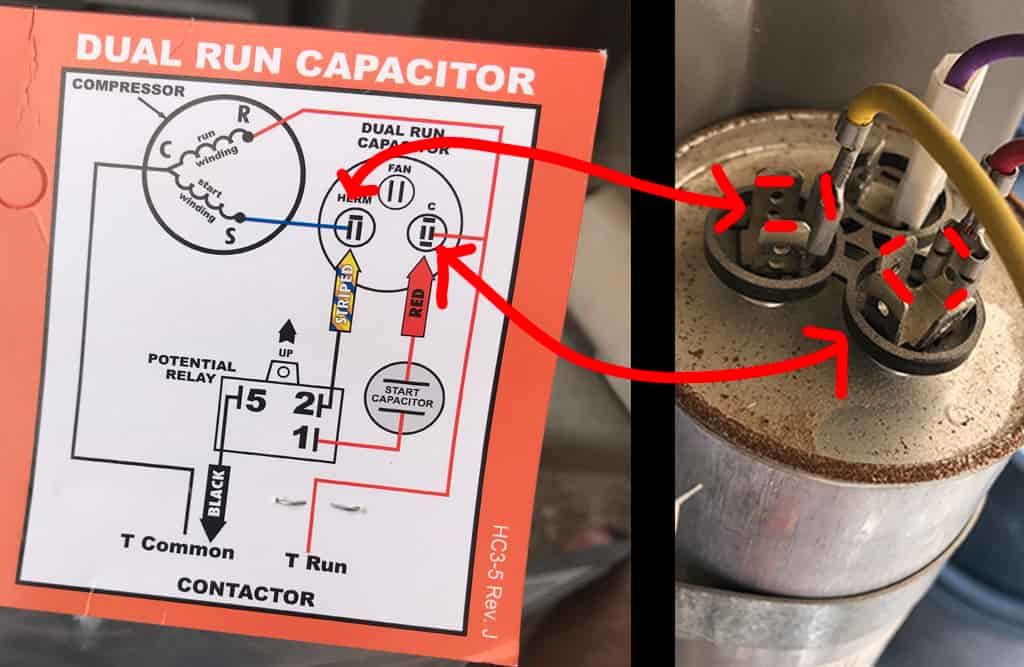
Connect the Hard Start Kit Red and Yellow Wires
First, I connected the Red and Yellow wires to their matching color wires on the top of the run capacitor. I'm not sure if the wires are standardized but I had two forms of verification. First, I sent a picture to my new A/C senior tech friend and he confirmed that yes, I should connect the matching colors.
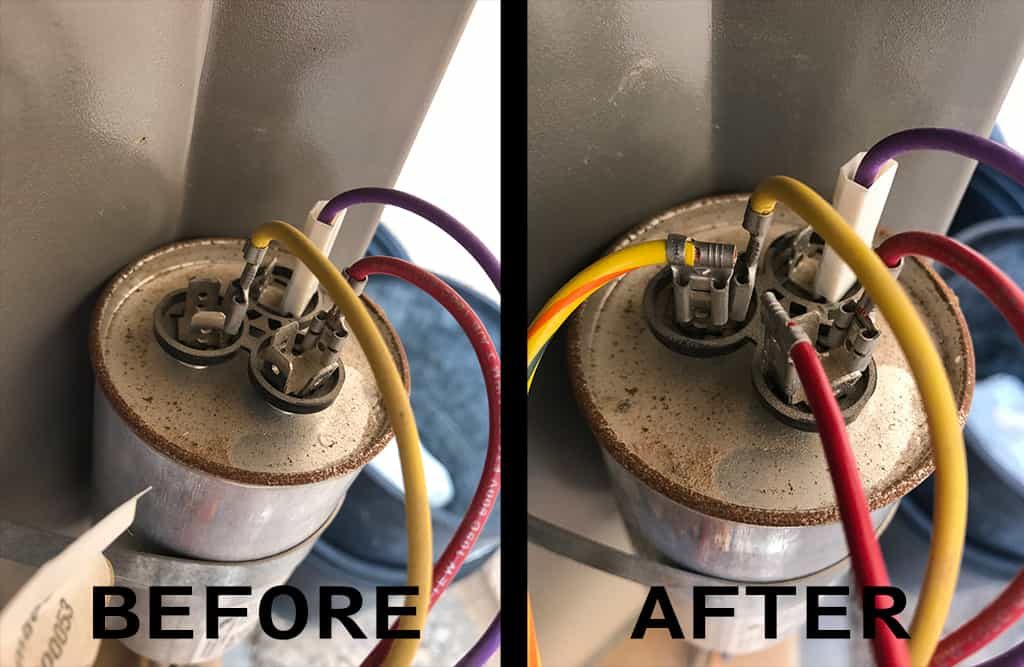
Second, as further verification, you'll see on the directions that the run capacitor has different amount of connectors for each connection type. The "c" has 4 connectors (red wire) and the Herm has 3 connectors (yellow striped wire).
Connect the Hard Start Kit Common / Black Wire
The "common" black wire gets connected to a common terminal. There just happens to be a few free connection posts available on the relay for this purpose. But you have to be careful to get the right connection post.
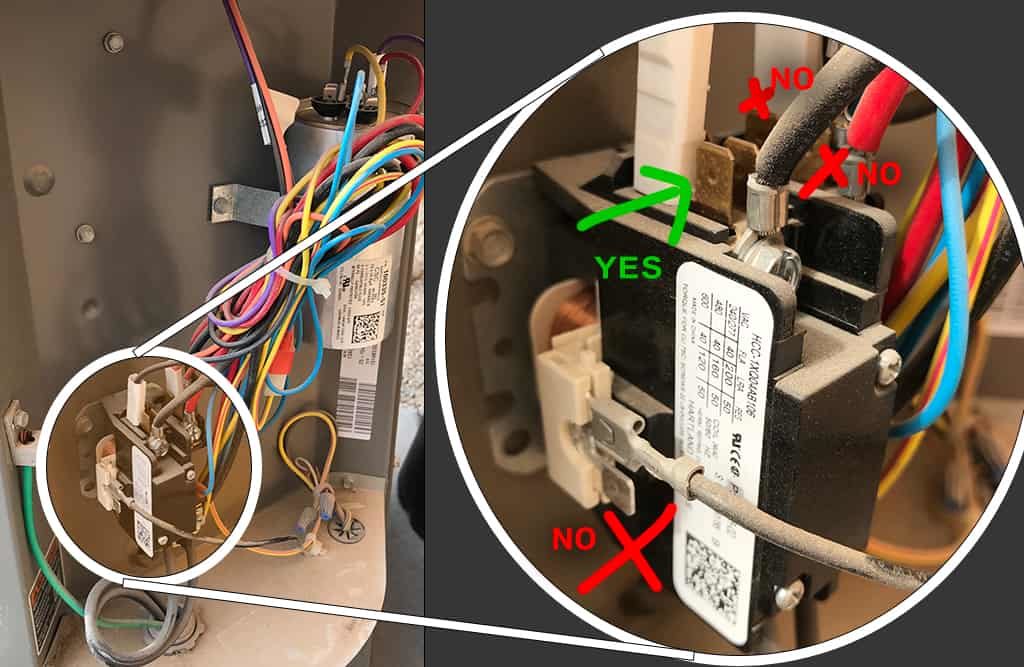
This was another potential pitfall as I didn't initially see the available posts on the top of the relay. I did see the black wire near the bottom left-hand side of the relay with an open post next to it (lower left hand "X" in the picture above) and asked my a/c buddy if I could use that, figuring it might be a "common" terminal because of the black wire. He replied that would be a huge mistake and I would blow my system if I did so, as that post is for the low voltage circuitry which controls the on/off state of that main power relay.
Verify The Installation
Make sure there are no loose wires or exposed metal that could cause a short circuit. With everything connected, I took some pictures and sent them to my a/c senior tech friend. He said it all looked good.
Test The Installation
With the confidence of having verification that everything looked properly installed, I next put the circuit breaker back in position and went inside and set the control panel for the unit to cool with a temperature that would cause the unit to turn on.
The unit fired up and everything worked just fine. Woohooo!!!!
Now, just because I installed this thing, doesn't mean its actually going to make my system start-up more efficient and therefore increase the life of my compressor. I needed to take a measurement to verify that the device IS ACTUALLY helping my system.
I needed to measure the "inrush" current and for that, I needed a special meter; one that specifically can measure "inrush" current. Using the "max" capture that's available on most clamp multimeters is not good enough (you'll need to google this to understand why).
The least expensive clamp multimeter I could find that had the specific capability of measuring A/C inrush current was the Mastech MS2108 True-RMS AC/DC Clamp Meter with Inrush Current Measurement which was about $60 when I purchased it.

If I really wanted to get the best of the best, then I would have purchased the Fluke 381 clamp meter, but at $500, that would have eaten up all the money I'd be saving by doing this task myself.
To measure the inrush current, I needed to turn off my home air conditioner and set the meter to the alternating current reading (the "A" with a single squiggly line above it) and clamp the meter over the black power wire that runs to the compressor. Then I pressed the yellow "SEL" button to lock it in the inrush mode. The meter then sat and waited for the inrush current that happened when I turned the air conditioning unit back on.
Here is a picture of the meter I bought clamped on the black power wire.
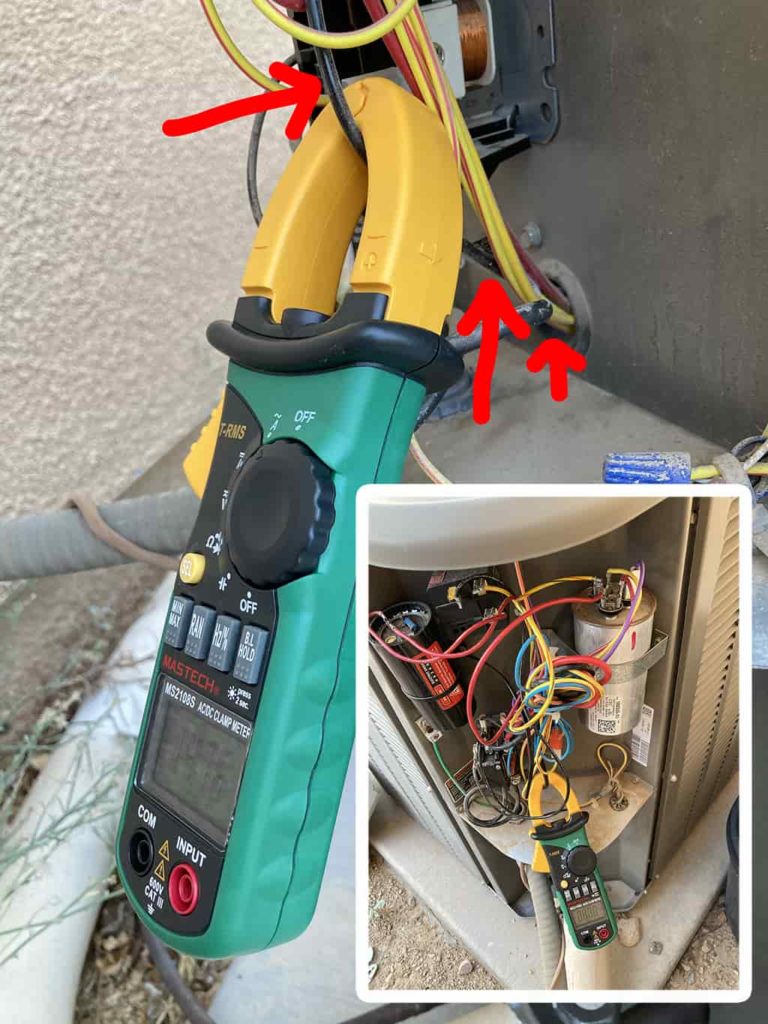
Notice the two bigger red arrows showing the heavy gauge black wire going through the meter A/C clamp probe. The little arrow shows the hole in the casing where the wire goes in to the compressor. The framed image in the lower right is to help give a perspective of where the meter is within the outer control panel.
My unit has a label on the outside of the compressor that tells me what the max inrush current should be. Its the"LRA" (Locked Rotor Amps) specification.
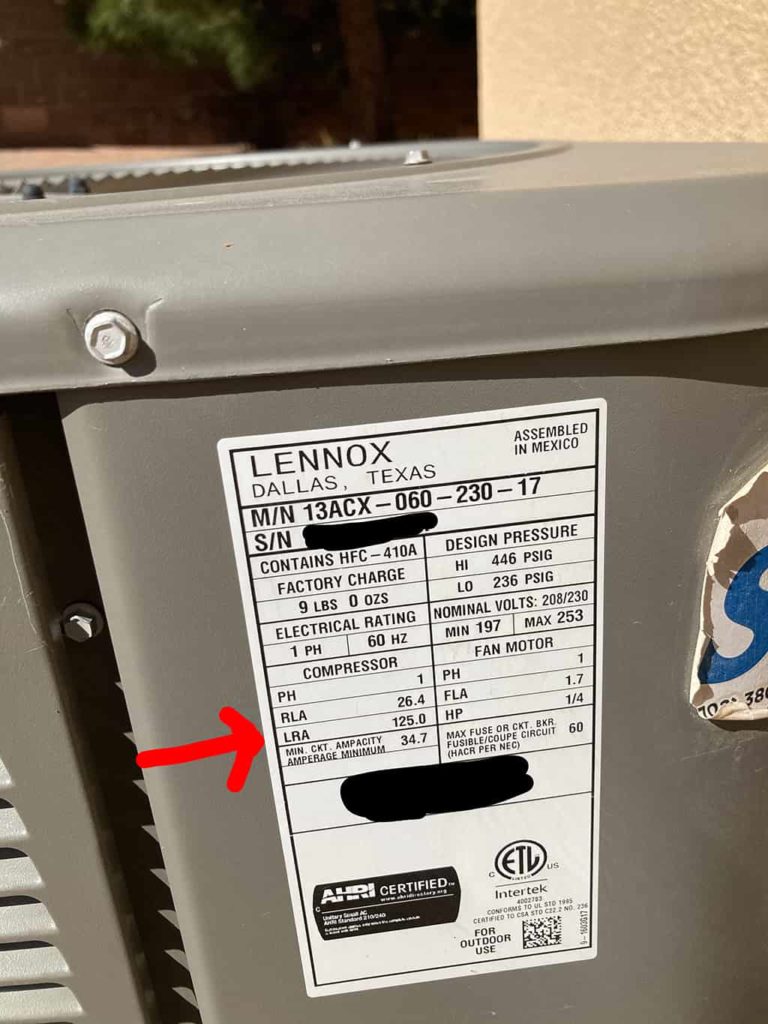
I made sure to take a few measurements before I added my Hard Start kit to see get a baseline reading so I could understand the current status of my start-up current. Then I made sure to take a few measurements after.
My start-up current was around 132 Amps before adding the kit and around 96 Amps after adding the hard start kit. So my kit brought my aging system back well within proper operating specifications.
Also note, that I didn't turn the AC unit on and off by unplugging and plugging in the circuit breaker (shown above). I don't like doing that because if you aren't perfect in putting the breaker back in each time, you can cause unnecessary voltage spikes and potentially damage your unit.
My process for the testing phase was to let the system handle turning the compressor on and off. I turned the air off at the temp sensor control in the house. Then I went outside and set the meter up. Then I went back inside and turned the air on. This was a bit cumbersome and sometimes I got locked out and had to wait for 5 minutes (a safety mechanism) for the unit to start back up, but doing it this way helped me keep peace of mind that I wouldn't blow my compressor out.
Value Calculation
As I usually do, I like to do the math to see if doing the project myself was worth my time. In doing so, I saved myself roughly $400. In total, I spent about 3.5 hours doing my research and 30 minutes (0.5 hours) on the install. So 4 hours total. Therefore in comparison to paying an a/c company, I instead paid myself $400 for 4 hours of work, which equates to paying myself $100/hour.
Where it gets even better is I still have to install a hard start kit on the other a/c unit on our house. That will take me 30 minutes, which, on a saving of $400, comes to equivalently paying myself at a rate of $800/hour on that install!
Conclusion
This endeavor was highly worth my time! In savings, I justified putting my valuable time towards researching the subject of "hard start kit" operation and installation. I was able to safely and properly install a Hard Start Kit on my air conditioning system.
As far as proof that a hard start kit actually does extend the life of an a/c unit's condenser, I'm not 100% sure it will, but I obviously do believe enough that I chose to install a hard start kit.
I have seen technicians using an ammeter to show that the start-up current draw is significantly reduced by installing a hard start kit. In theory that reduced current draw, because of the increased efficiency (increased torque from the voltage/current phase shift), should reduce the mechanical wear and tear on the condenser and thus extend its life.
However, I haven't yet found any actual research papers or data backed proof that proves using a Hard Start Kit does in fact empirically extend the life of an air conditioner's condenser.
The whole thing could be just a gimmick that all the a/c companies and technicians recommend because of how much they make installing it. One of those things where someone comes up with a theory, and a bunch of people buy into it because they make money on it (think Wall Street).
But the theory and examples of proof I was able to find online do seem to agree with my knowledge and seem to highly indicate it will increase the life of the a/c unit. So I chose to move forward with the install.
Links to Purchase Hard Start Kit
9 comments on “Increasing the Life of Your Air Conditioner: How to Install a 'Hard Start' Kit”
Leave a Reply
Recent Posts
Reolink Argus 2 Review: From an Owners Perspective
I Made the World a Little Safer!
A Typical Parenting Moment from the Parent of a Child with FASD
Volunteering
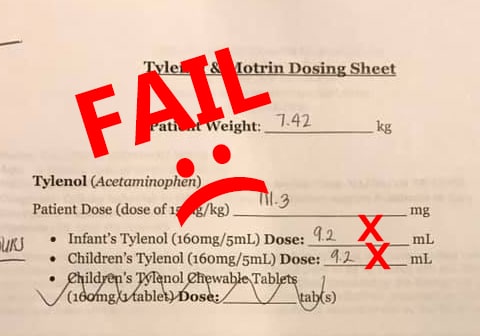
We Were Sent Home From the Hospital with Instructions that Could Have Killed Our Son

After School Programs: Your Child May Not Be As Safe As You Think

FAS - You Wouldn't Say That About My Child If It Was Autism
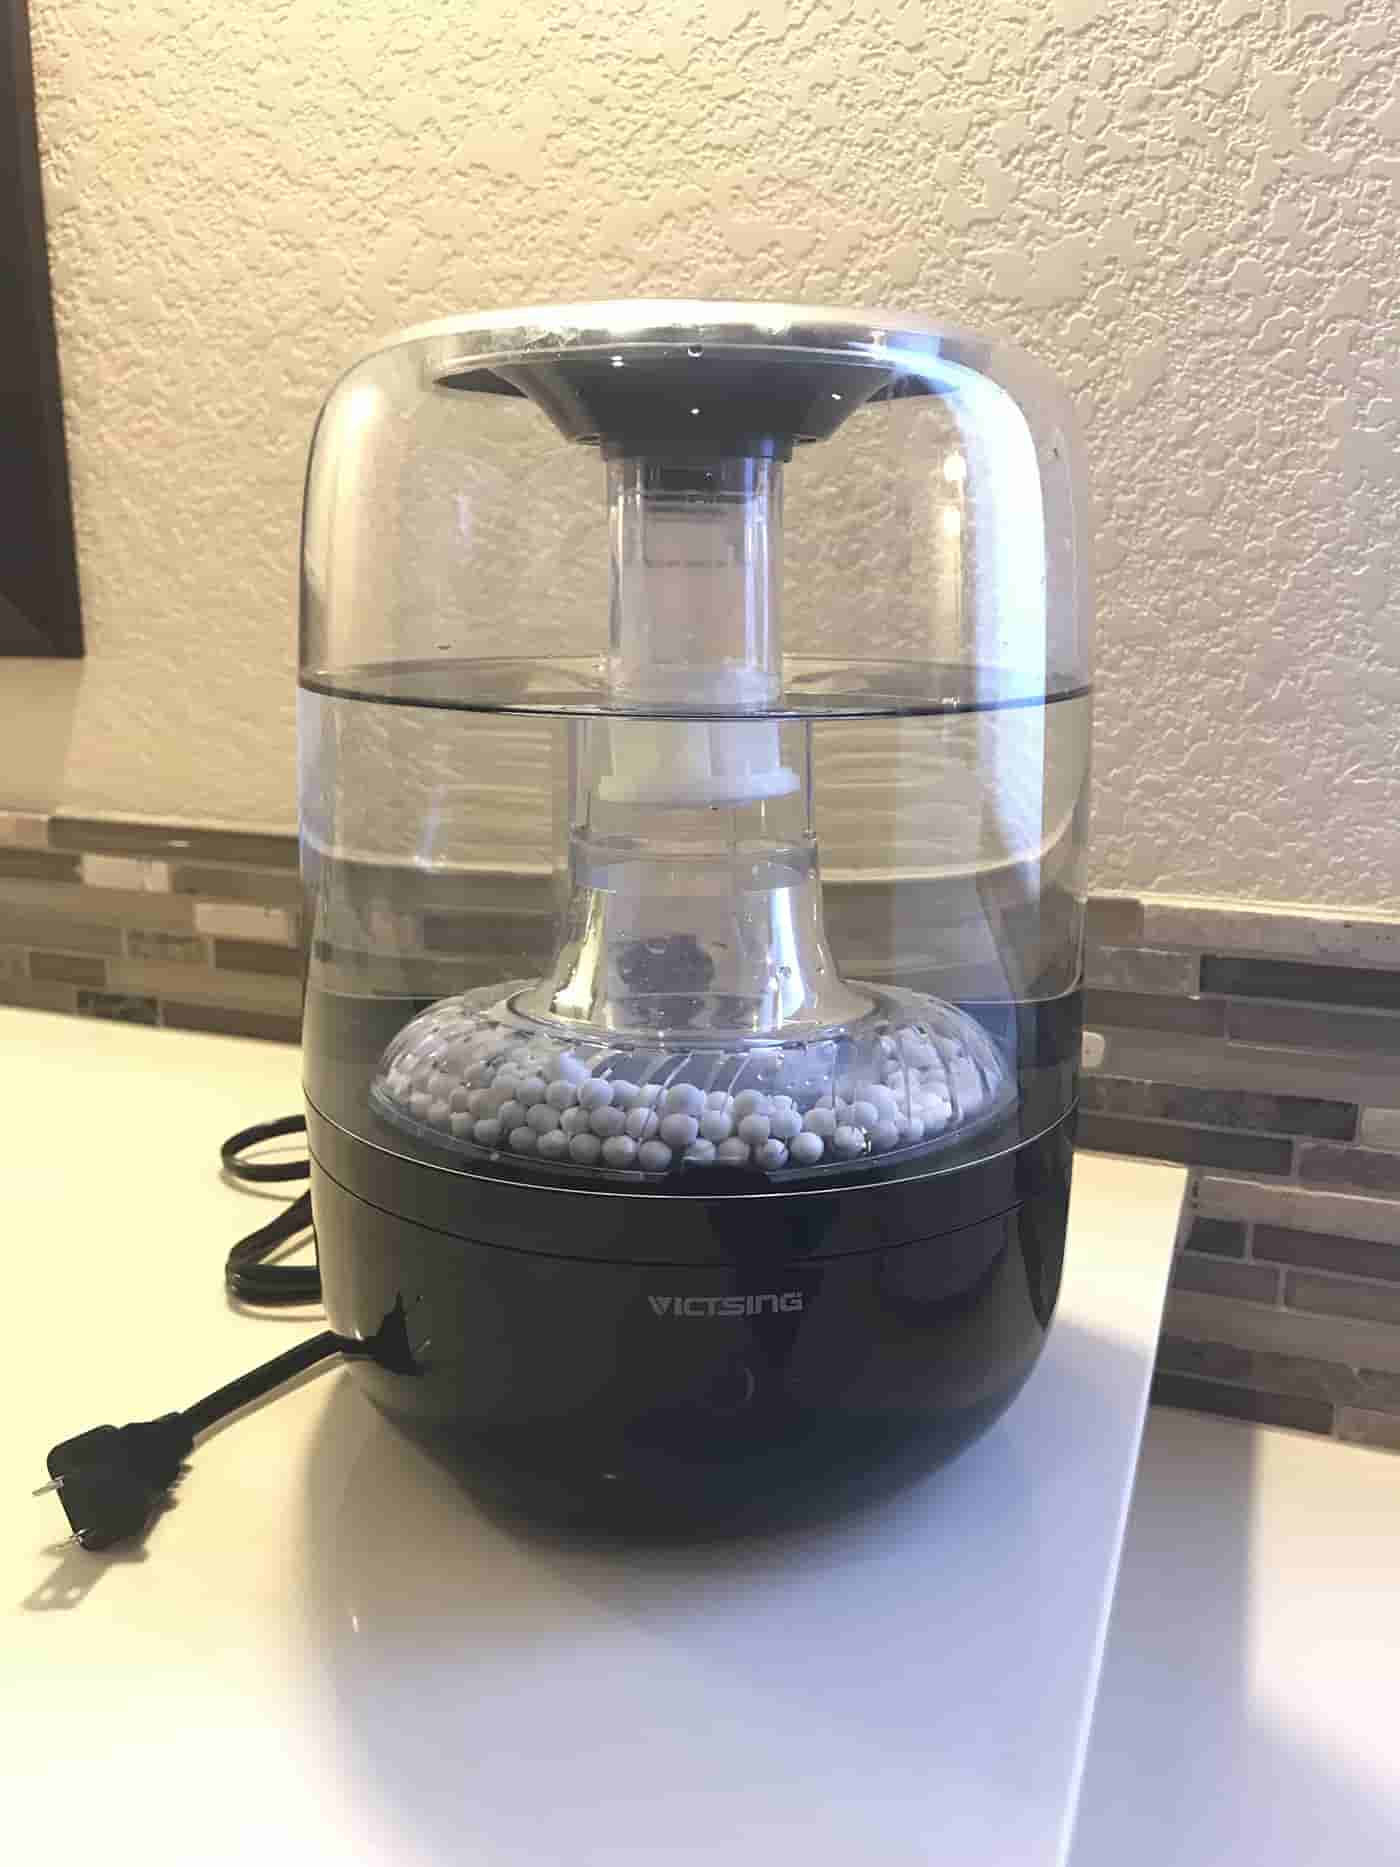
VicTsing Filterless Cool-Vapor Humidifier Review
Increasing the Life of Your Air Conditioner: How to Install a 'Hard Start' Kit

A/C Hard Start Kit: A $1,600 Per Hour Story
you should verify voltage with ac setting when checking the run capacitor. it is an ac device. dc will not read anything even if it is charged.
Thanks for the comment George... The only way a capacitor can hold a charge with the power removed from the circuit is if there is a static voltage difference; which means the capacitor is in a DC type of state. A capacitor is not specifically an "A/C" or "DC" device; the type of capacitor used in these circuits can be used in either situation. If there is a charge stored on a capacitor, it will need to be read in a DC setting on a voltmeter. There is no such thing as an "A/C" charge STORED on a capacitor because A/C inherently means the current is alternating (causing the voltage to change). You can't store alternating current. Though this capacitor is used in an A/C situation if the power is cut when the current/voltage is at its peak (120V), a static DC voltage could potentially remain on the capacitor.
Regardless, I clarified that section... when I was discussing testing the capacitor for a stored charge, I was referring to testing it in an off state after the power had been removed from the system. If the capacitor was holding a charge, the voltmeter in DC would show a reading, but would actually discharge it as it was reading it. If testing in AC mode, it won't show anything and will just discharge the capacitor. Either way, the goal of safely removing any potential residual charge would be accomplished.
Hello Terry Caliendo!
Your article is very informative and appreciated very much.
The HVAC tech that recently performed the tune up on my daughter's unit also recommended a Hard Start Kit ($250) as well as: a Dual Circuit Phase Shifter ($224), an AC Renew Oil Treatment ($267), a UV Light (bulb only $499! (it already has a light installed but burned out)) AND a UV Photo Max Air Purifier ($899).This really freaked out my daughter, thinking that this should be done (instead of "recommended"). Nevertheless, the gouging that this industry does is ridiculous.
My questions for you are: #1 have you installed a Dual Circuit Phase Shifter? #2 Have you any experience with the AC Renew Oil Treatment?
Sorry about the lengthy comments but I would appreciate your comments. 11/11/2020
Ha! Wow! There seems to be a LOT of upselling here... Again, I'm not an expert but let's go through them...
I can't even find "Dual Circuit Phase Shifter" if I google it with "air conditioning" except for one forum post that says it's just a capacitor, which is what I expected. And that makes sense for an upsell name because capacitors do shift the phase between the voltage and current. I think this is talking about the "run" capacitor which may need to be changed. "Dual Circuit Phase Shifter" sounds much more expensive than "run capacitor". If I'm correct in what they are trying to sell, the capacitor is, at most, a $20 part.
AC Renew Oil Treatment - I only did a quick search on this and one of the first posts had "snake oil" in it. It's supposed to be an additive that helps "clean" your system internally. I've never had it offered to me, but I wouldn't put something like that in my system without MAJOR further research. Something like that could really cause some harm long term to your entire system as it flows through all the parts.
My system doesn't have a UV bulb or any "UV Photo Max Air Purifier". From quick research, these are additions to systems to help kill germs, bacteria, odors, etc. Personally, I'd need to see some strong evidence of their actual ability to do what they say they do before purchasing one. If you buy a UV sanitizer on amazon, you have to run that thing on an object for 20 minutes to (supposedly) kill all the bacteria, so with that in mind, I'd be amazed that a UV bulb could kill bacteria in the air that is flying past it at high velocity.
I do suggest having your outdoor condenser coil cleaned yearly. You can do this yourself (I should write another blog post). The company that does my inspections does this as part of their inspection.
Hi Terry,
Thanks for all the details and the linked article about deciding you should add this kit.
My experience is post-failure, so I was in a slightly different situation. When the A/C wasn't working, I checked the obvious and quickly knew that the compressor wasn't starting. I didn't hear all the associated clicks that would have told me it was trying to start. So, I called for service. I generally trust my service company. The owner has demonstrated excellent knowledge about the systems he services and I've paid him a lot of money for upgrades and new systems, but that is all beside the point.
I had an older A/C unit that failed recently, and before calling for service, my quick Google search pointed to the capacitor. I knew I'd have to research what size capacitor and then order it and wait for arrival. I wanted to just have it working. Getting the capacitor off the service truck was a $345 bill including the $90 base service charge.
Back to the "Hard Start" kit ... it was another $90 service call charge. Service man also was checking coolant pressure, but since the compressor wasn't starting, he couldn't get a proper reading. Although this company usually keeps a hard-start kit on every truck, he didn't have one. I will also note here that my unit is only 3-years old. Beyond warranty, but my older unit that just needed a capacitor is 20 years old. Tech was on site almost 2 hours before he gave up for the day and said he'd be back tomorrow. So there was a 2nd "truck roll", and a helper/trainee for another 2 hours on day 2. Total cost, about $550. At least in real hours of pay, this is well below $100/hour, but it unfortunately showed the inexperience of the tech on this call.
I'll accept that sometimes equipment fails earlier in life than "normal". The tech was diagnosing what he could to get the A/C working on the first day. Installation of the Hard-Start kit was deemed the solution. Tech said they normally install these on units closer to 10-years old. Still, after reading all your research, and with my past experience with this service company, I am disappointed they didn't just recommend a hard-start kit be installed when it was brand new and charge a "reasonable" price as part of the original installation.
I have one more A/C unit, also about 3 years old, and after reading your post and paying for the repair, I'll be installing a hard-start kit preventatively on the other unit.
Thank you for your detailed post.
This is a great article.I have been through this and Tech told me 250 dollars for hard start kit.If not than I have to replace my compressor which will cost much more.I have ordered a hard start kit for my AC and will be installing it soon and will update the forum here.
From what I have read somewhere, the LRA actually is not reduced in amperage by the hardstart kit , it is just shortened in time so that a multi meter can’t read the split second LRA max when the exact time startup occurs it just catches the amps on the downside of startup, however shortening this time of LRA should be beneficial as less heat and depreciation to the compressor occurs.
You are partially correct... the the startup current time is shortened, but that's because of the increased efficiency from the added torque (which comes from the capacitor affecting the voltage/current phase). The start up capacitor ALSO reduces the max current at start up because of the efficiency gain. Typical multimeters can't catch the startup current. You need a special multimeter that can catch that startup current. I link to two of these meters in the "Test The Installation" section above.
Finally, here is a video that backs up my discussion about efficiency.
https://www.youtube.com/watch?v=uLyZBkfHWf8
(see the 2 minute mark)
Thanks for the reply